Wednesday, September 16, 2015

Horizontal display of Collection data in ADF page

There was a requirement in one of my past projects to build an ADF page to enter Order quantity for different sizes of an item based on the availability of that item. Customer has asked for a layout like the below.

Size
5
6
7
Available Quantity
10
20
30
Order Quantity


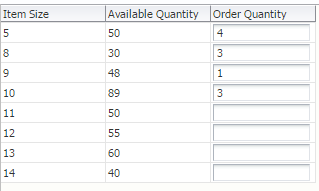
Since ADF table layout is inherently vertical, page with an ADF table will be displayed as below:-


Since the horizontal display in this scenario ease the entry of Item Quantity while viewing its Availability, the users were very particular about the horizontal display, which seemed fair to me as well.
I was using Jdev 11.1.1.6. I thought of leveraging pivot table initially, but later figured that it cannot serve my purpose. Finally zeroed in on an approach to have horizontal display of data, which I would like to share with you.

  • Create a panel group layout with layout as horizontal and create two panel group layouts inside that.
  • One Panel group layout with layout as vertical will hold the Text of the Data, i.e. Item Size, Available Quantity and Order Quantity.
  • Second Panel group layout with layout as horizontal will have af:iterator component to hold the values from the collection(here it is a view object).

JSPX Code


 1
 2
 3
 4
 5
 6
 7
 8
 9
10
11
12
13
14
15
16
17
18
19
20
21
22
23
24
25
26
27
28
29
30
31
32
33
34
35
36
37
38
<af:panelGroupLayout id="pgl11" layout="horizontal"
                     inlineStyle="border:2px solid; margin:5px; padding:5px; border-color:Gray;">
  <af:panelGroupLayout id="pgIterator1" layout="vertical" >
    <af:outputText value="Item Size" id="it31"
                   inlineStyle="font-weight:bold; vertical-align:super;"></af:outputText>
    <af:spacer width="0" height="1" id="s1"/>
    <af:separator id="s5"
                  inlineStyle="border:1px solid; border-color:Gray;"/>
    <af:outputText value="Available Quantity" id="it21"
                   inlineStyle="font-weight:bold; vertical-align:super;"></af:outputText>
    <af:spacer width="0" height="3" id="s2"/>
    <af:separator id="s6" inlineStyle="border:1px solid; border-color:Gray;"/>
    <af:outputText value="Order Quantity" id="it11"
                   inlineStyle="font-weight:bold; vertical-align:super;"></af:outputText>
  </af:panelGroupLayout>
  <af:panelGroupLayout id="pgl1" layout="horizontal" >
    <af:iterator id="iter1" value="#{bindings.ItemsVO1.collectionModel}"
                 var="row">
      <af:panelGroupLayout id="pgIterator" layout="vertical"
                           inlineStyle="border-left:solid 2px; margin-left:5px; padding-left:5px; border-color:Gray;">
        <af:outputText value="#{row.Itemsize}" id="it3"
                       inlineStyle="display:block; text-align:center; vertical-align:bottom;"></af:outputText>
        <af:spacer width="0" height="4" id="s3"/>
        <af:separator id="s7" inlineStyle="border:1px solid; border-color:Gray;"/>
        <af:outputText value="#{row.Atp}" id="it2"
                       inlineStyle="display:block; text-align:center; vertical-align:bottom;"></af:outputText>
        <af:spacer width="0" height="4" id="s4"/>
        <af:separator id="s8" inlineStyle="border:1px solid; border-color:Gray;"/>
        <af:inputText value="#{row.bindings.Quantity.inputValue}"
                      id="it1" contentStyle="width:22px">
          <f:validator binding="#{row.bindings.Quantity.validator}"/>
          <af:convertNumber groupingUsed="false"
                            pattern="#{bindings.ItemsVO1.hints.Quantity.format}"/>
        </af:inputText>
      </af:panelGroupLayout>
    </af:iterator>
  </af:panelGroupLayout>
</af:panelGroupLayout>


The final layout will look like this.


Monday, September 14, 2015

Rendered property missing in OAF personalization


I have seen questions in OTN forum that when users want to hide fields in seeded OAF pages via personalization, they are not able to find the 'Rendered' property for those input fields.


Cause:
    The 'Required' property of that input text field is set to true at design time. That is the reason why the 'Rendered' property is not visible in the page personalization mode.
Even if you try to programmatically achieve this, it might have impacts on the functionality, as the system always expects a value for this attribute.


Sunday, September 13, 2015

Retrieve XML data from database, Parse and display in OAF page


I recently came across a requirement to display XML data in an OAF page where each XML tag value will be displayed in separate UI components.

Though this is done for OAF screens, the below solution applies to ADF as well.

Requirement: Raw XML data is stored in the database in a column of type XMLTYPE. The XML data needs to be parsed and then display those values in OAF UI components.

Sample XML Data
 1
 2
 3
 4
 5
 6
 7
 8
 9
10
11
<?xml version="1.0" encoding="UTF-8" standalone='yes'?>
<order>
  <order_details>
    <order_num>2353</order_num>
    <currency>USD</currency>
    <line_details>
      <line_number>2949</line_number>
      <quantity>1</quantity>
    </line_details>
  </order_details>
</order>

Solution:
1.       Create a PL/SQL procedure to retrieve the XMLType data, convert to CLOB and return the CLOB value           

1
2
3
4
5
6
7
8
xml_out XMLTYPE;

SELECT xml
   INTO xml_out
  FROM xx_interface_log_tbl
WHERE log_id = TO_NUMBER (P_LOGID);

xml_out_clob:=  xml_out.getClobVal(); -- xml_out_clob, a CLOB variable which is the OUT parameter of the procedure.
      
2.       Build OAF page with all the components that corresponds to the XML tag values. As per the above example, we will have OrderNumber, Currency, Line_Number and Quantity.

3.       Create Transient VOs to hold the XML data. XXOrderHeaderVO and XXOrderLineVO

4.       In the processRequest of the page’s controller, get the ID of the record with which we can query the XML data from the table. Assume that the id is being passed as a parameter from the previous page. Invoke the AM method by passing the log_id

1
2
3
String pLogId = (String)pageContext.getParameter("ORD_LOG_ID");
Serializable[] funcParam = { pLogId };
am.invokeMethod("retrieveXML", funcParam);

5.     Below are the code snippets from the Application module which
a.       calls the PLSQL procedure to retrieve the XML data in CLOB format
b.      converts the CLOB into a Document.
c.       retrieves the values of XML elements and populate in VOs.


 1
 2
 3
 4
 5
 6
 7
 8
 9
10
11
12
13
14
15
16
17
18
19
20
21
22
23
24
25
26
27
28
29
30
31
32
33
34
35
36
37
38
39
40
41
42
43
44
45
46
47
48
49
50
51
52
53
54
55
56
57
58
59
60
61
62
63
64
65
66
67
68
69
70
71
72
73
74
75
76
77
78
79
80
81
82
83
84
85
86
87
88
89
90
91
92
93
94
95
96
public void retrieveXML(String logId) {
//Intialize Variables
        try {
            OracleCallableStatement stmt =
                (OracleCallableStatement)this.getDBTransaction().createCallableStatement("Begin XXSCM_RETRIEVE_ XML(:1,:2); end;", 10);
            stmt.registerOutParameter(1, OracleTypes.CLOB);
            stmt.setString(2, logId);
            stmt.execute();
            CLOB cl = (CLOB)stmt.getCLOB(1);
            Document doc = getOrdInbXmlDocument(cl);
            if (doc != null) {
                processOrderValues(doc);
            }        } catch (Exception e) {
//Handle Exception
        }
    }


    public Document getOrdInbXmlDocument(CLOB cl) {
        try {
            XMLType xmlType = XMLType.createXML(getCurrentConnection(), cl);
           String xmlStr = xmlType.getStringVal();
            DocumentBuilder docBuilder =
                DocumentBuilderFactory.newInstance().newDocumentBuilder();
            InputSource inputSource = new InputSource();
            inputSource.setCharacterStream(new StringReader(xmlStr));
            Document doc = docBuilder.parse(inputSource);
            return doc;
        } catch (Exception e) {
            //Handle Exception
        }
    }


    public void processOrderValues(Document doc) {
        NodeList orderNodes = doc.getElementsByTagName(order_details);//Tag Name. Refer the Sample data above
//Create new VO Header row, hdrRow
        for (int i = 0; i < orderNodes.getLength(); i++) {
            Element element = (Element)orderNodes.item(i);
        hdrRow.setOrderNum(getTagValue(element, order_num)); );//Tag Name
        hdrRow.setCurrency(getTagValue(element, currency)); );//Tag Name                 processOrderLineValues(element, hdrRow);

        }
    }

    public void processOrderLineValues(Element element,
                                       XXOrderHeaderVORowImpl hdrRow) {
        NodeList childNodes =
            element.getElementsByTagName(line_details); //Tag Name           
        for (int i = 0; i < childNodes.getLength(); i++) {
            //Create new VO Line row, linesRow
            Element lineElement = (Element)childNodes.item(i);
            linesRow.setLineNumber(getTagValue(lineElement,
                                                      line_number));
            linesRow.setQuantity(getTagValue(quantity));
        }
    }

    public String getTagValue(Element element, String tagName) {
        String tagValue = null;
        try {
            NodeList title = element.getElementsByTagName(tagName);
            Element line = (Element)title.item(0);
            tagValue = getCharacterDataFromElement(line);
        } catch (Exception e) {
            //Handle Exception
        }
        return tagValue;
    }

    public static String getCharacterDataFromElement(Element e) {
        Node child = e.getFirstChild();
        if (child instanceof CharacterData) {
            CharacterData cd = (CharacterData)child;
            return cd.getData();
        }
        return "";
    }

    private Connection getCurrentConnection() {
        Statement stmt = null;
        try {
            stmt = getDBTransaction().createStatement(0);
            return stmt.getConnection();
        } catch (Exception e) {
//handle exception
        } finally {
            if (stmt!= null)
                try {
                    stmt.close();
                } catch (Exception ex) {
//handle exception
                }
        }

    }